

Automation Delay Tool
IN THIS ARTICLE
Sometimes you don't want the next automation step to run immediately. For example, you may need to wait for another app to finish processing data or delay an action until a specific time.
The Automation Delay tool lets you pause an automation before the next steps run. You can delay it:
- for a set number of minutes;
- until a specific date and time;
- according to a defined schedule. To add the tool:
-
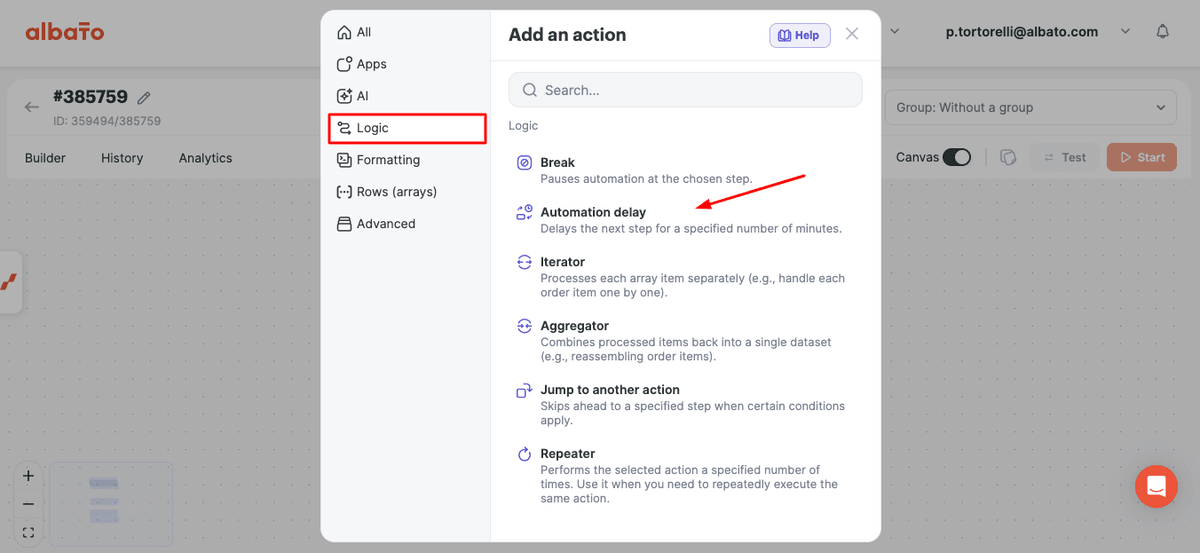
Click the + button.
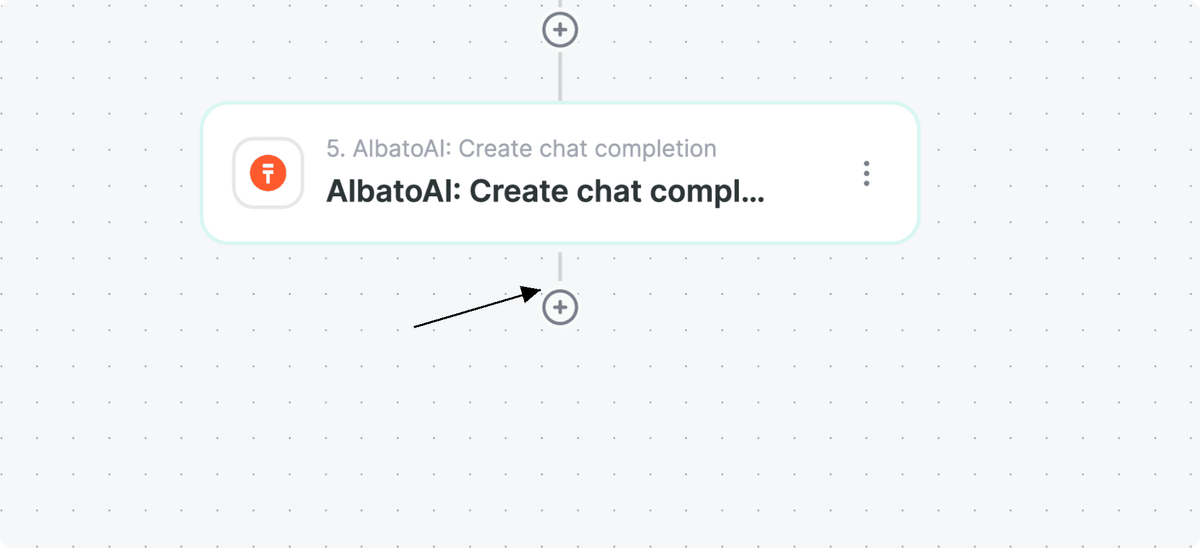
-
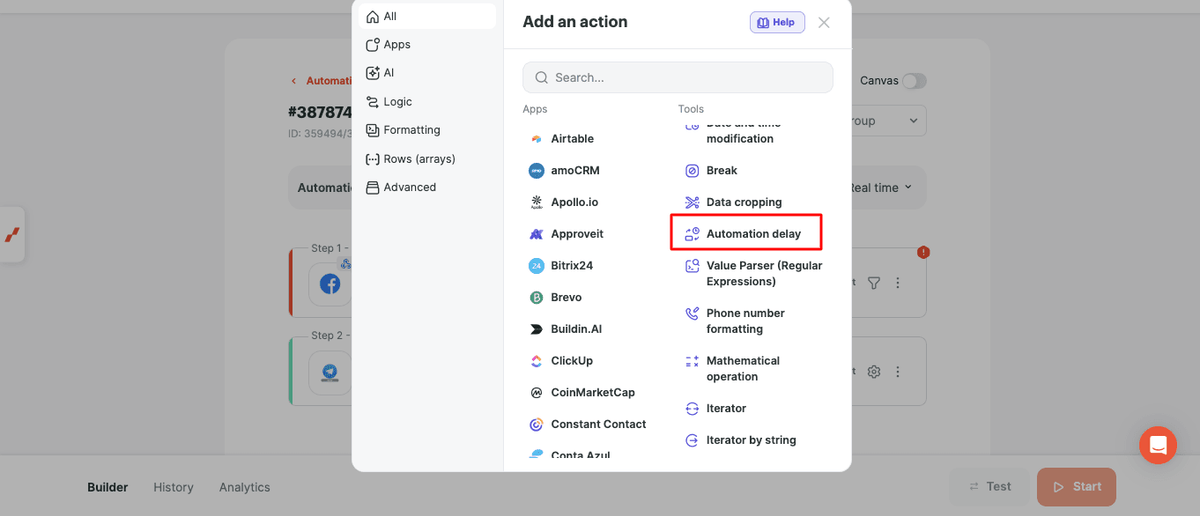
Select Automation delay.
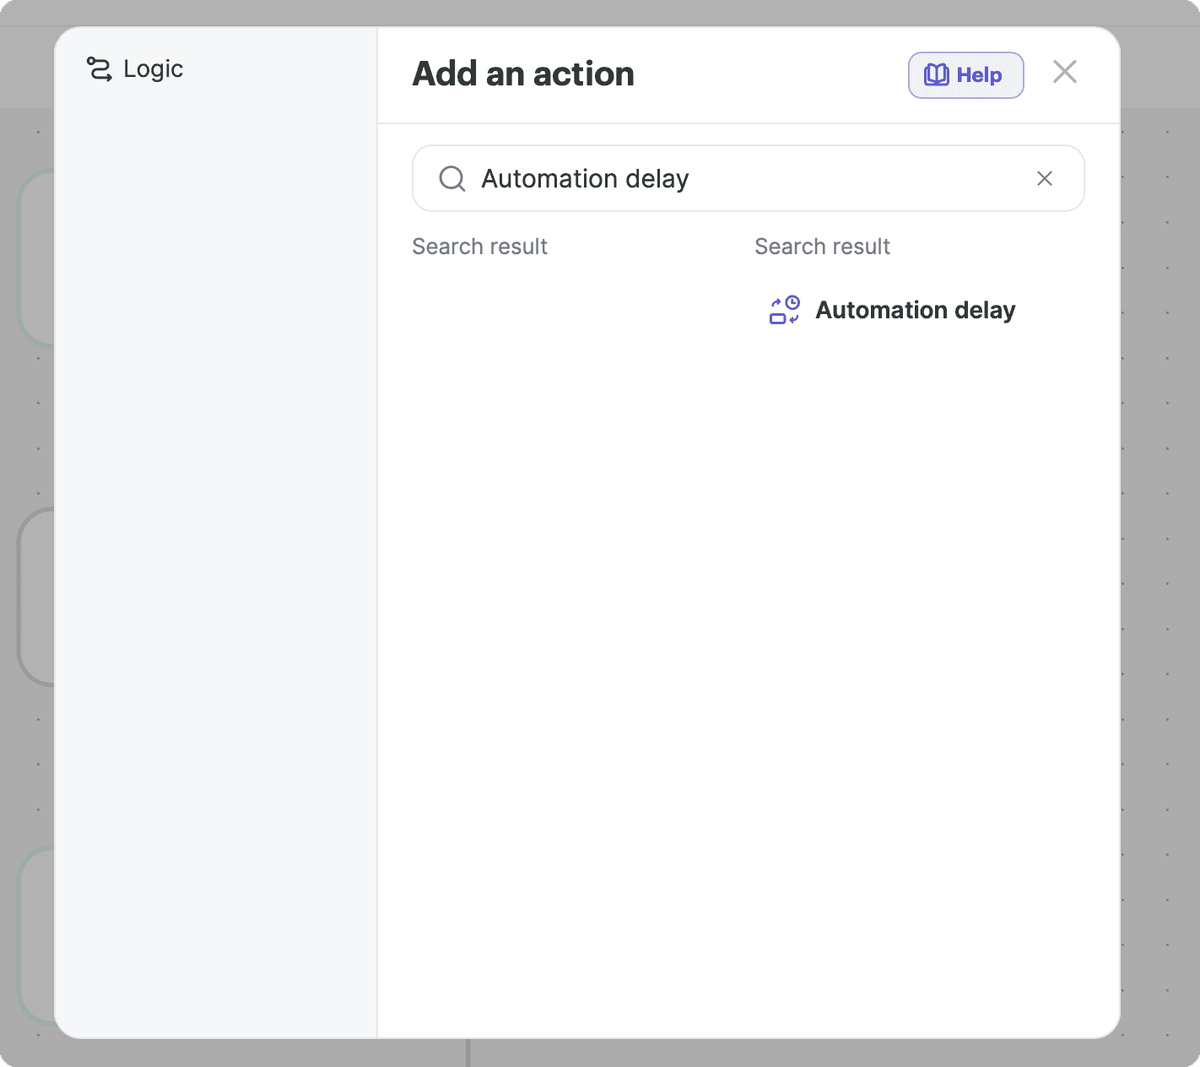
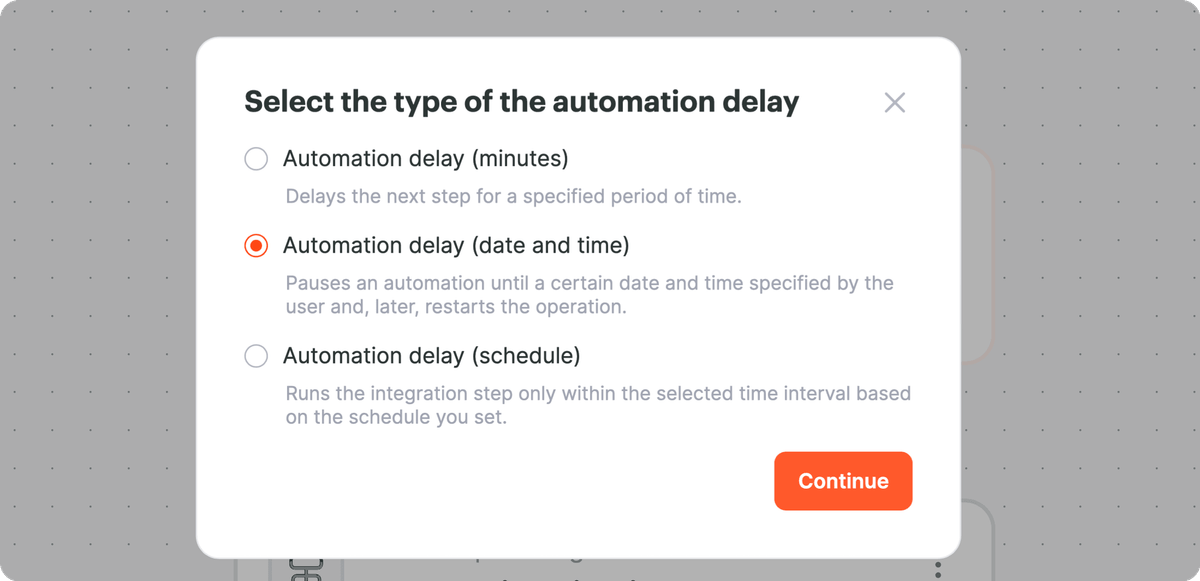
Once the tool is added, choose the delay type that fits your case.
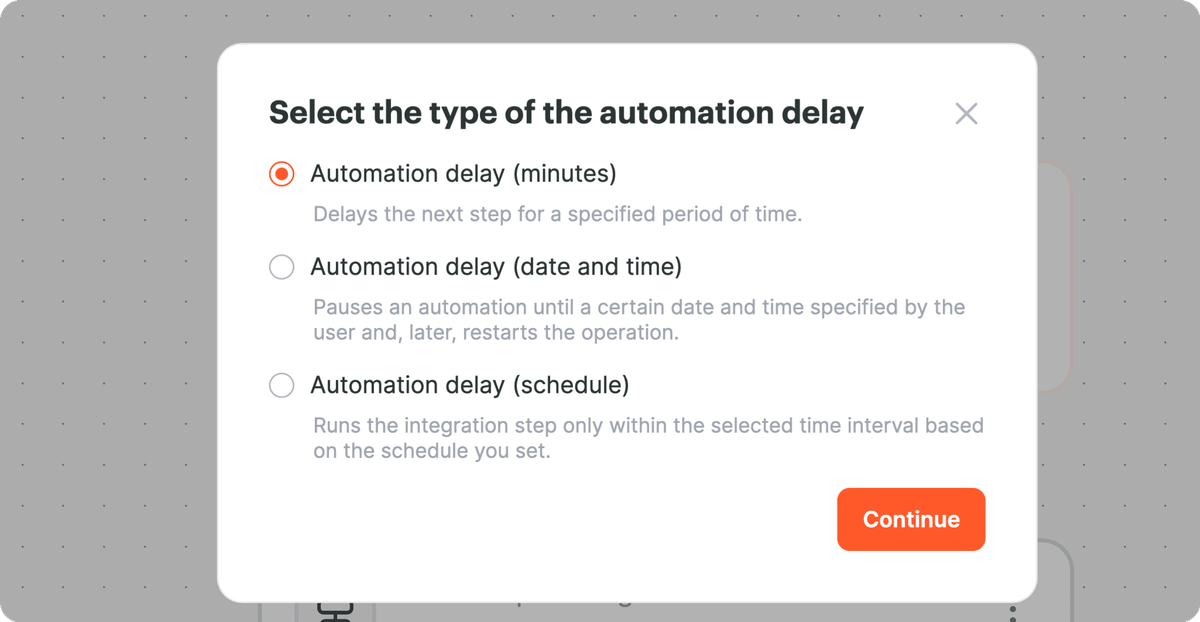
Delay Types
The tool supports three modes:
Automation delay (minutes)
Pauses execution for a set number of minutes.
Automation delay (date and time)
Pauses execution until a specified date and time.
Automation delay (by schedule)
Pauses execution according to a defined schedule.
Automation Delay (Minutes)
Use this mode when you need to pause an automation for a fixed amount of time before the next step runs.
Common use cases include:
- waiting for an external service to finish processing data;
- sending a follow-up notification after a delay;
- retrying a request a few minutes later. Select Automation delay (minutes).
In the Delay (in minutes) field, enter the number of minutes to wait.
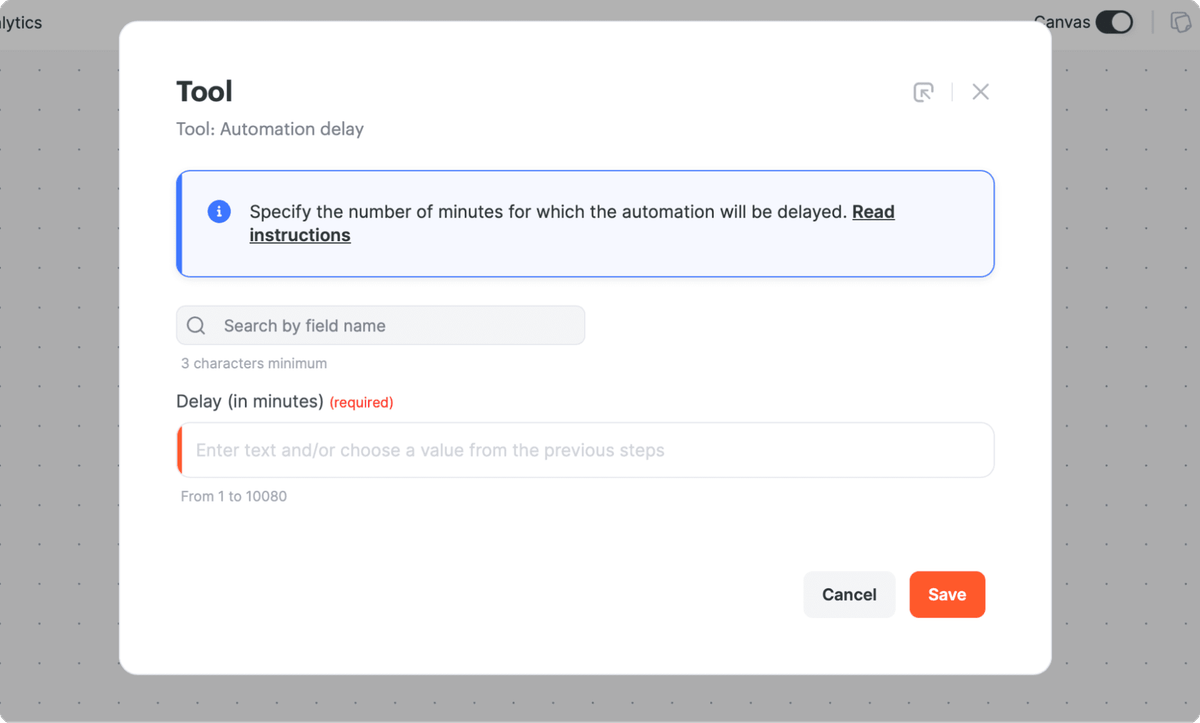
Allowed values range from 1 to 10,080 minutes. Once the specified time has passed, the automation resumes automatically.
Example: An Automatic Call After a Lead Comes in
Suppose a new lead arrives in your CRM, and a few minutes after the card is created you need to call the client.
Automation
Google Ads → HubSpot → Automation delay → Twilio
After the lead comes in, the record is created in the CRM right away, while the call to the client is placed after the specified number of minutes.
For example, if the tool is set to 5, the call is placed 5 minutes after the lead is created.
Example: Monitoring Lead Handling
A head of sales wants to make sure that managers reach out to every new lead.
Automation
Lead source → HubSpot → Automation delay → Telegram
A 60-minute delay is set between creating the lead and sending the notification.
An hour after the lead arrives, the manager receives a message in Telegram with a link to the deal card and can check whether the client was called.
Automation Delay (Date and Time)
This mode lets you pause an automation until a specific date and time. When that moment arrives, the automation resumes automatically.
Use this mode when the next step should run only after a certain date and time.
For example:
- send a message on a specific day and time;
- postpone execution until an order's delivery date;
- wait for an event's start date;
- run the next step on a date stored in your CRM or another system. Unlike a delay in minutes, here you don't need to calculate the waiting time. Just specify the date and time after which the automation will continue.
Select Automation delay (date and time).
In the Delay (date and time) field, enter the date and time after which the automation should continue.
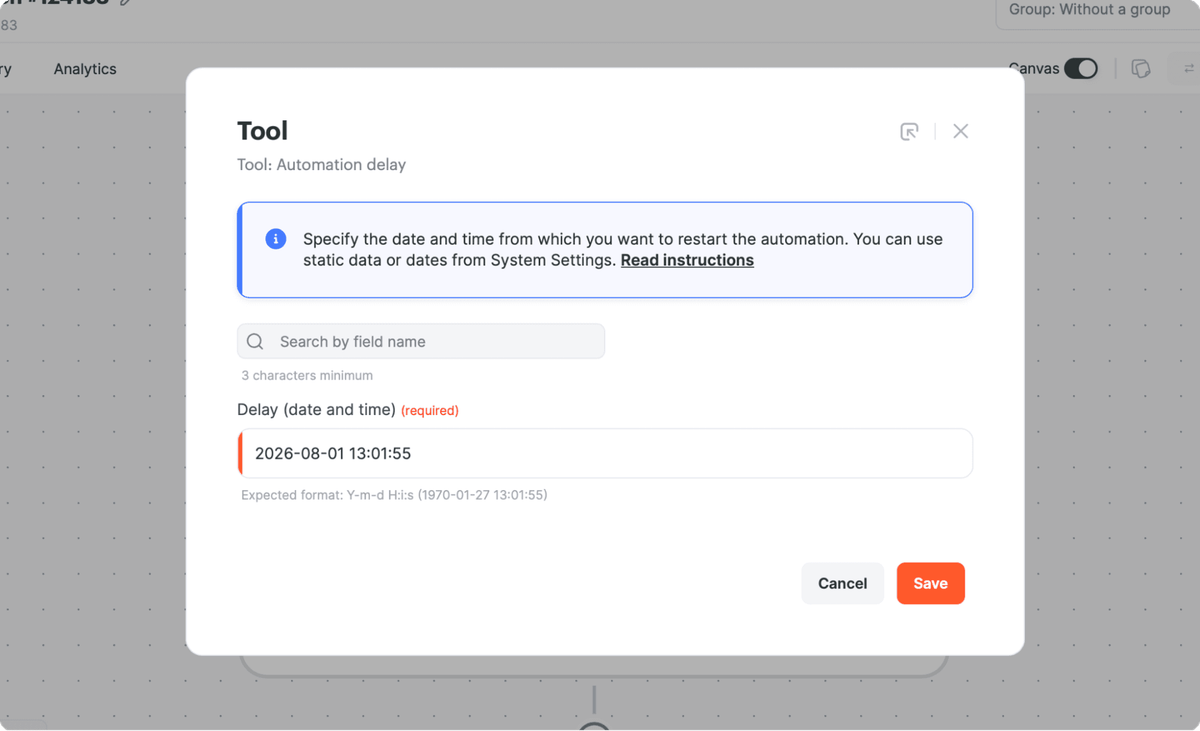
You can use:
- a fixed date;
- data from previous steps. Expected format
Y-M-D H:M:S
Example: 2026-07-01 10:00:00
If the message should be sent on July 1, 2026 at 10:00, enter
2026-07-01 10:00:00
If the task should appear on December 31, 2026 at 23:59, enter
2026-12-31 23:59:59
Instead of a fixed date, you can pass a value from your CRM, a form, or another app. For example, if the previous step passes the value 2026-09-15 14:30:00, Albato will wait for that date and time to arrive and then resume the automation.
Automation Delay (by Schedule)
Use this mode when you want an automation to wait until a specific day or time before continuing.
If data arrives during the delay period, it isn't lost. Albato saves it, pauses the automation, and automatically resumes the remaining steps when the scheduled time comes.
Available schedule options:
- Every day;
- Weekdays;
- Days of the month;
- Specific date.
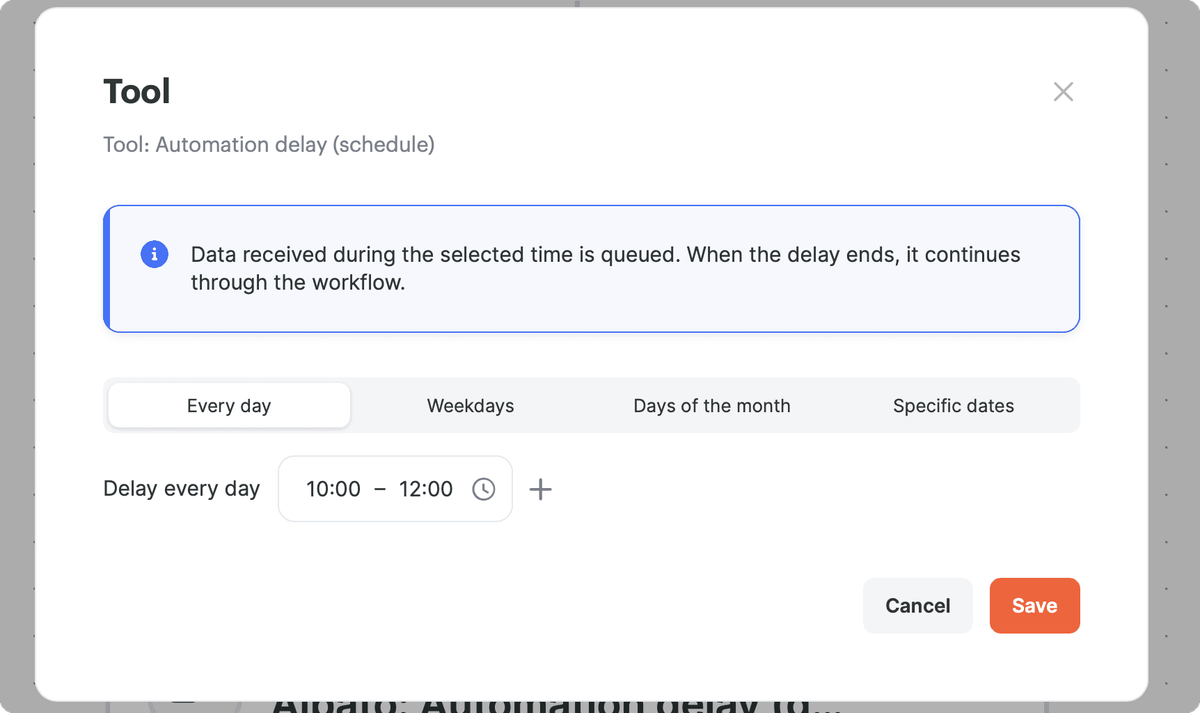
Use Every day if the delay should apply at the same time every day. For example, you can pause data processing every night from 22:00 to 09:00.
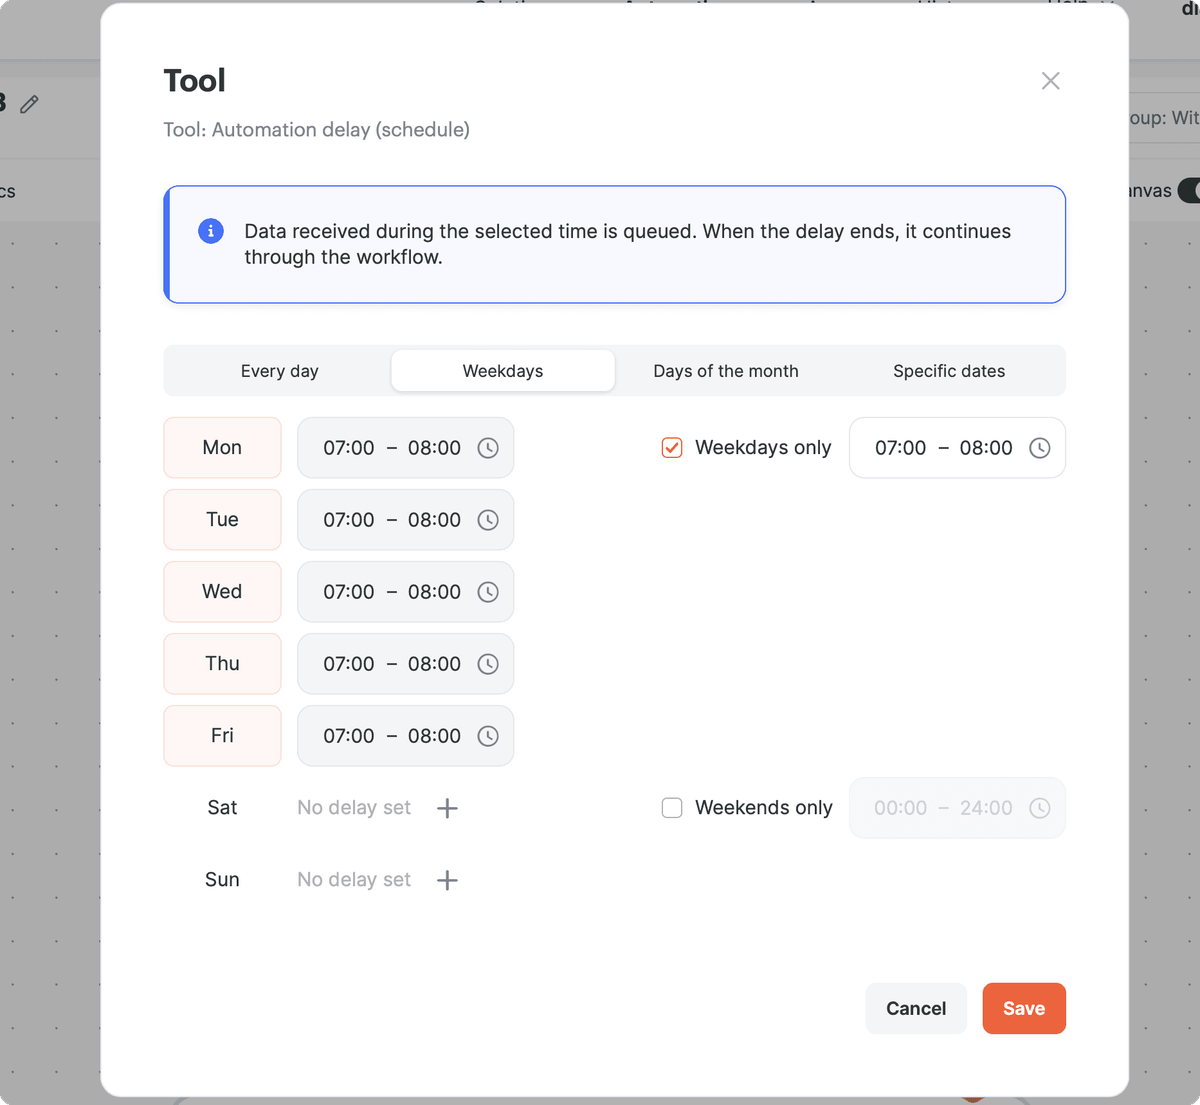
Use Weekdays to set a schedule separately for each day of the week.
For example:
- process requests on business days only;
- pause work on weekends;
- use different intervals for different days.
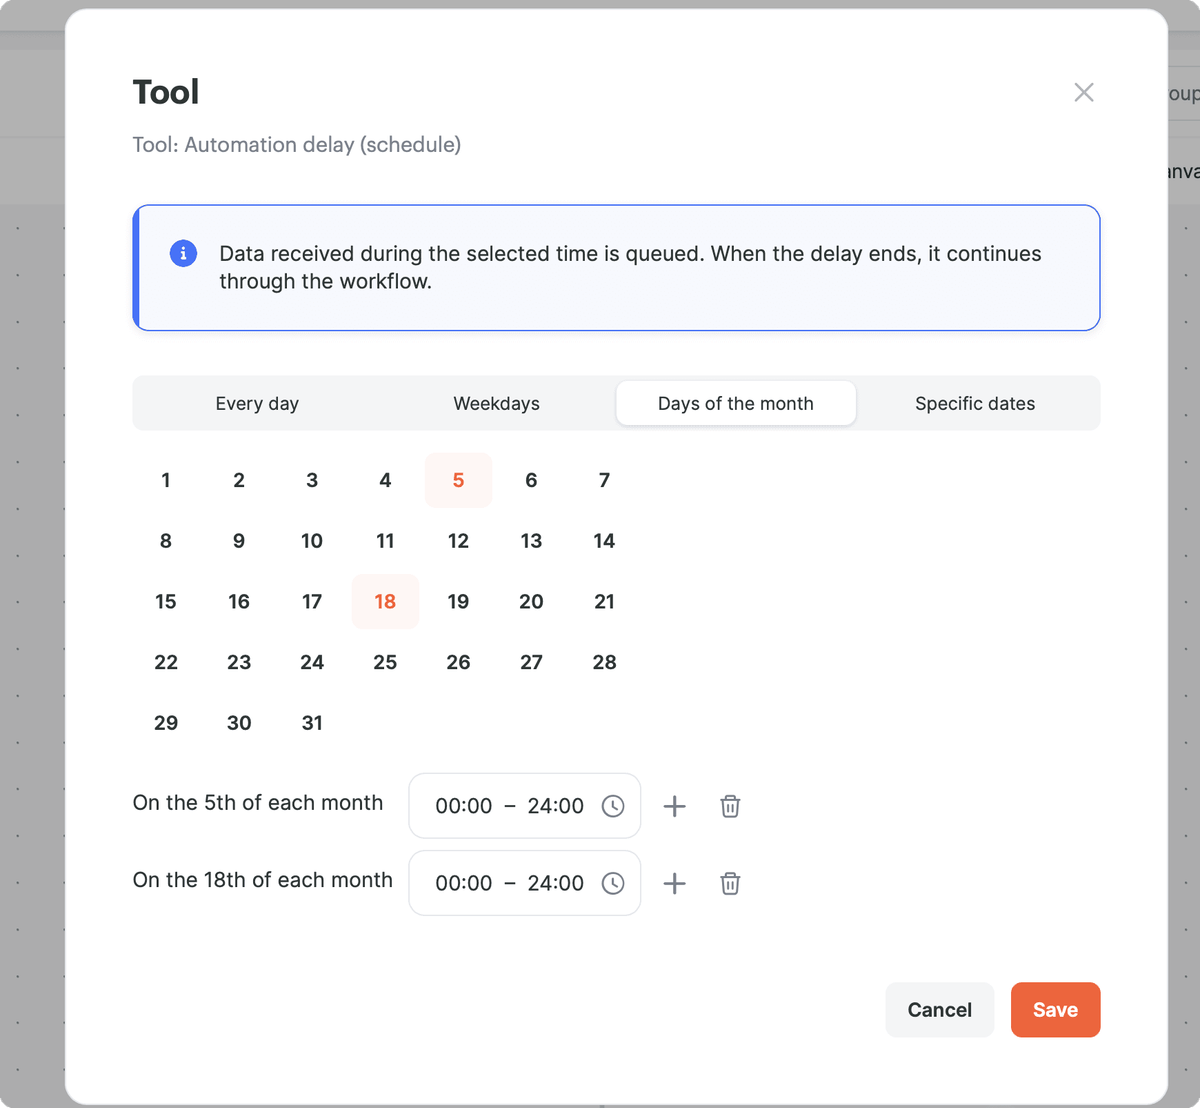
Use Days of the month to select specific days of each month.
For example:
- the first day of the month;
- reporting close days;
- holidays;
- maintenance dates.
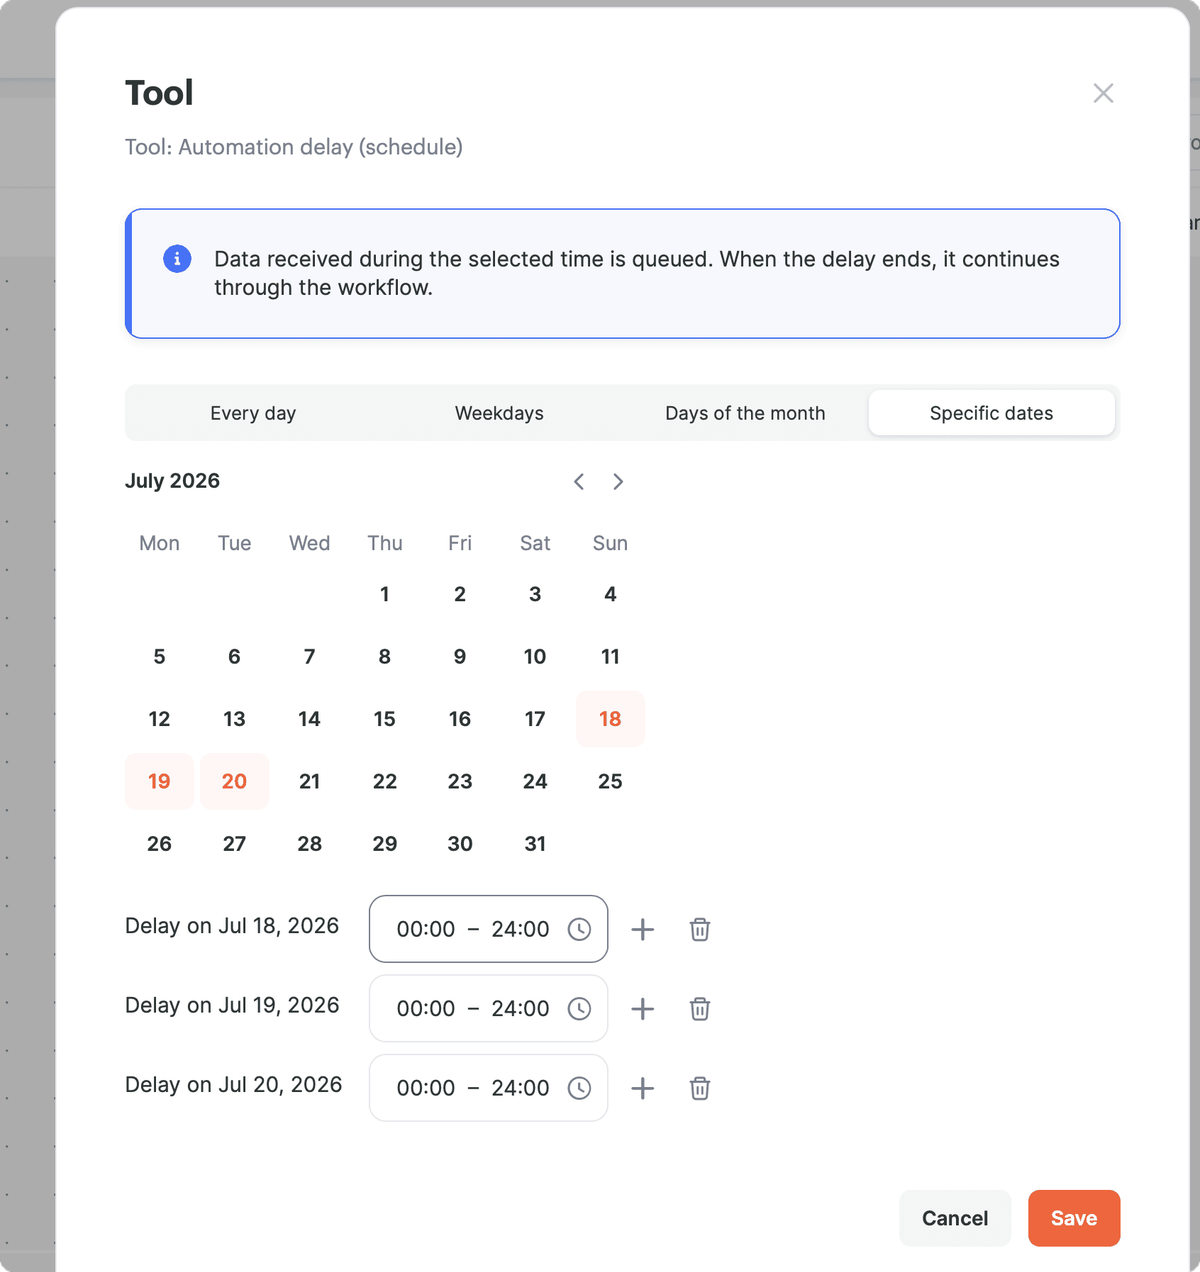
Use Specific date to select individual dates. This option is useful for vacations and one-off restrictions.
Example: Don't Process Requests on Weekends
Suppose the sales team works on business days only. Requests that arrive on weekends should be processed on Monday.
Automation
Webhook → Automation delay (by schedule) → CRM
Settings
- open the Weekdays tab;
- set an all-day delay for Saturday and Sunday.
If a request arrives on Saturday or Sunday, the data is saved, the automation is paused, and once the delay period ends, the request continues processing automatically.
This scenario is especially useful for webhook triggers that can't resend data later.
Example: Don't Send Notifications at Night
Suppose clients shouldn't receive messages at night.
Automation
CRM → Automation delay (by schedule) → SMS
Settings
- open the Every day tab;
- set the delay period from 22:00 to 09:00.
If an event happens at 23:30, the message won't be sent right away. It stays pending and is sent once the delay period ends.
Example: Pause Processing on Holidays
Automation
Form → Automation delay (by schedule) → CRM
Settings
- Open the Specific date tab.
- Select the holiday dates.
- Set the delay period.
If data arrives on a selected day, it is saved and processed automatically once the delay period ends.
Example: Don't Run the Automation on Reporting Close Days
Some companies temporarily stop sending data to financial systems on certain days of the month.
Automation
CRM → Automation delay (by schedule) → ERP
Settings
- open the Days of the month tab;
- select the dates you need;
- set the delay period.
If data arrives on a selected day, it waits for the delay period to end and continues processing automatically later.
How a Scheduled Delay Differs from a Filter
A filter checks a condition and can stop an automation.
The Automation Delay works differently. Instead of stopping the automation, it saves the data, pauses the execution for the specified time, and then automatically continues with the following steps.
Use a scheduled delay when incoming data needs to be processed later rather than stopped by a filter.
How to Send an Email a Set Time After a Customer Makes a Purchase
Imagine a scenario where your customer has completed a purchase in your ecommerce store. You can use the purchase completed or order created trigger to identify this event.
To better understand the customer's purchase experience, you can send an email after a certain amount of time asking for a satisfaction survey, for example.
If that email went out immediately, the message could get mixed up and lost among other informational emails, such as purchase confirmations, delivery updates, or similar notifications.
Here is how to configure this type of delay in your automation using the Automation delay tool.
Attention
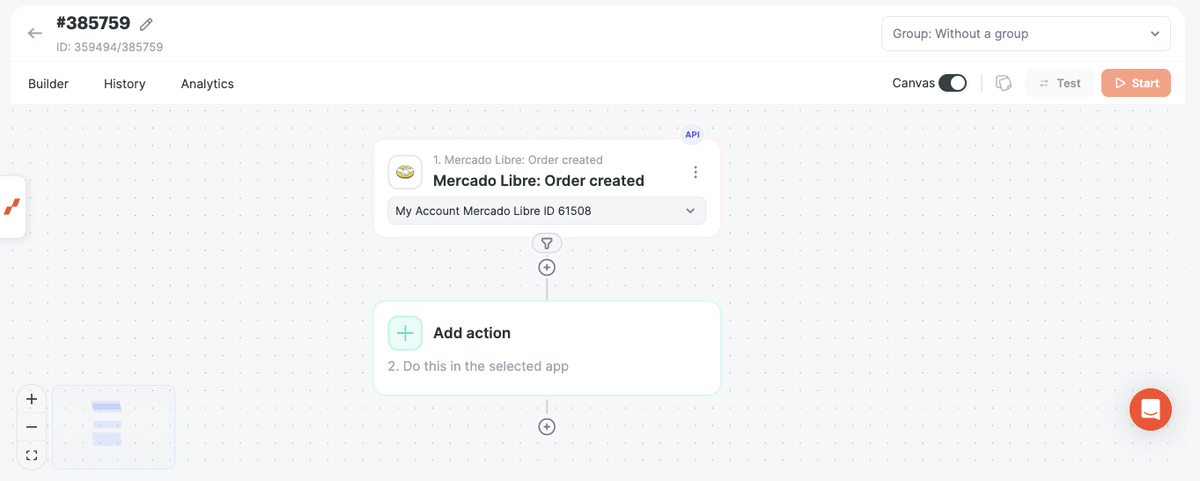
In this example we use the Mercado Libre order approved trigger, but you can use similar triggers and the same logic if your store runs on other apps, such as Nuvemshop, Shopify, WooCommerce, Wix, and others.
Start by adding the trigger you need.
Then add the Automation delay step.
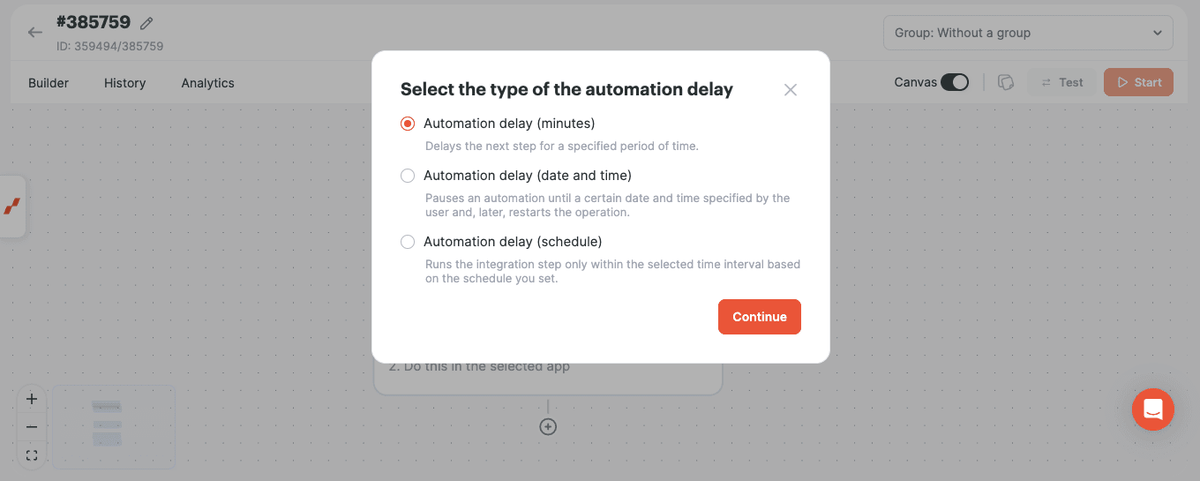
Select the delay in minutes.
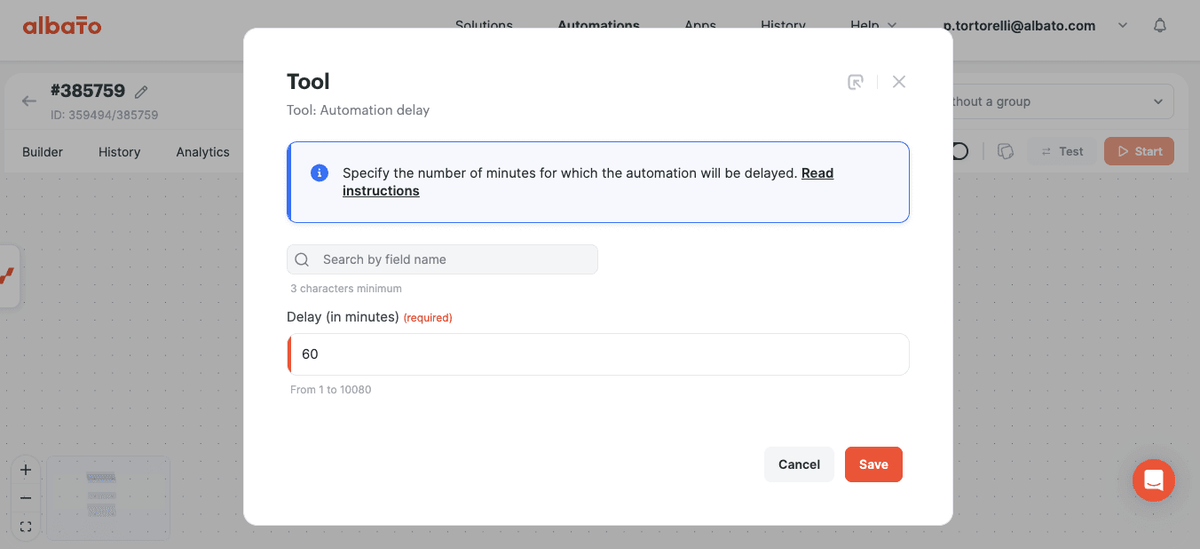
Now define how many minutes the automation should wait before it runs the next step. In our example we set a 60-minute delay, which is one hour.
Keep in mind
You can set the waiting time here up to a maximum of 10,080 minutes, which equals 7 days (168 hours).
Finally, add the email sending step with the information you prefer, mapped the same way you would in any other Albato automation.
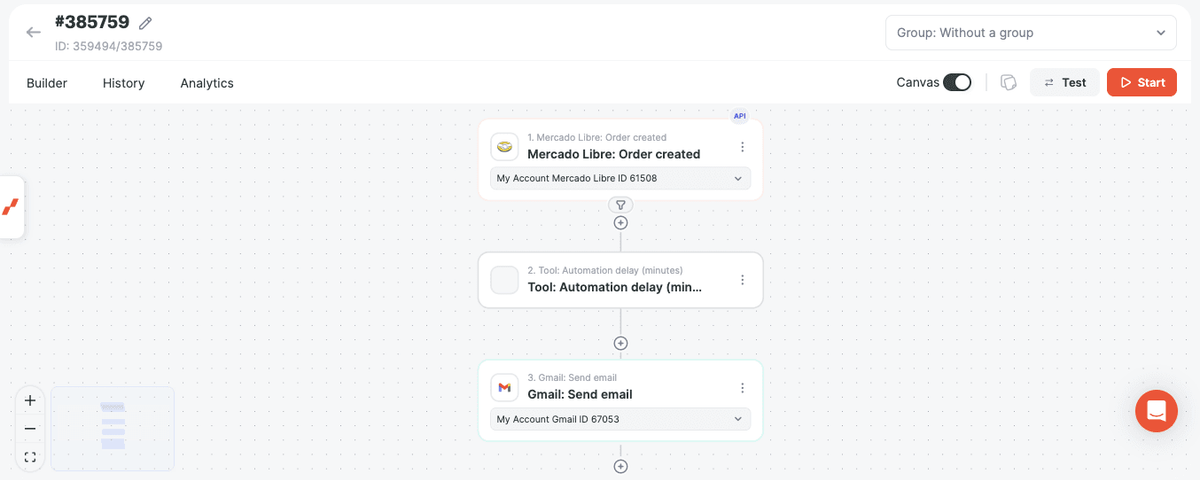
You can reuse this same workflow logic to send Telegram messages, Meta-approved WhatsApp templates, or messages through other apps instead of email. Just select the app you need.
Now you can control exactly when the next steps of your automation run. If you have any questions, contact our support team through the chat in your Albato account.
How to Configure an Automation Delay Schedule
Use Automation delay (schedule) to pause the next steps during specified time periods. For example, you can hold incoming leads overnight and send their details to the next app during business hours.
The schedule defines when the automation must wait, not when it should start.
Data received during a waiting period is queued. When that period ends, the data continues through the remaining automation steps.
- Add the Automation delay tool where the automation should pause.
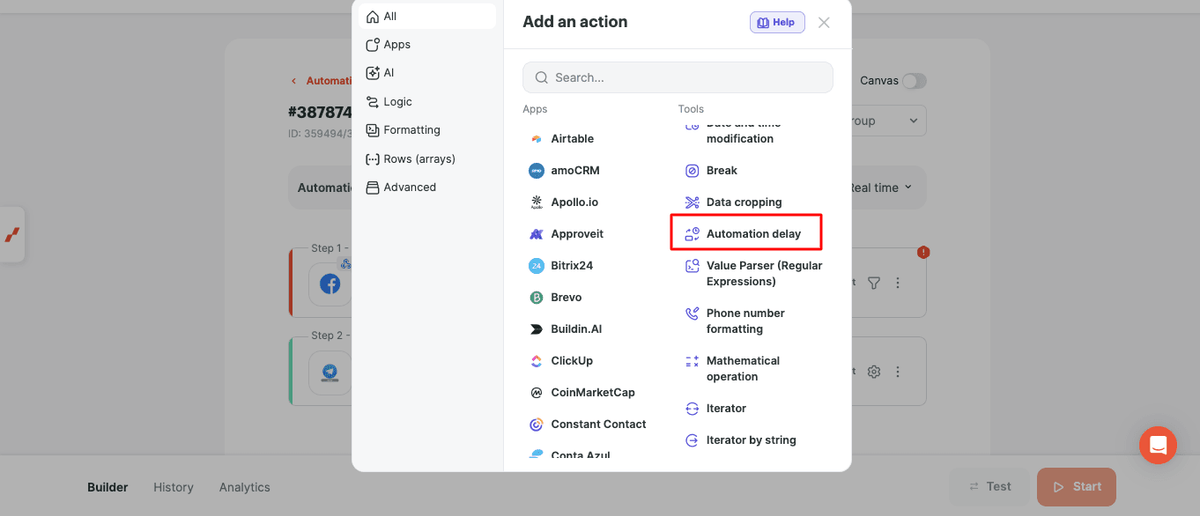
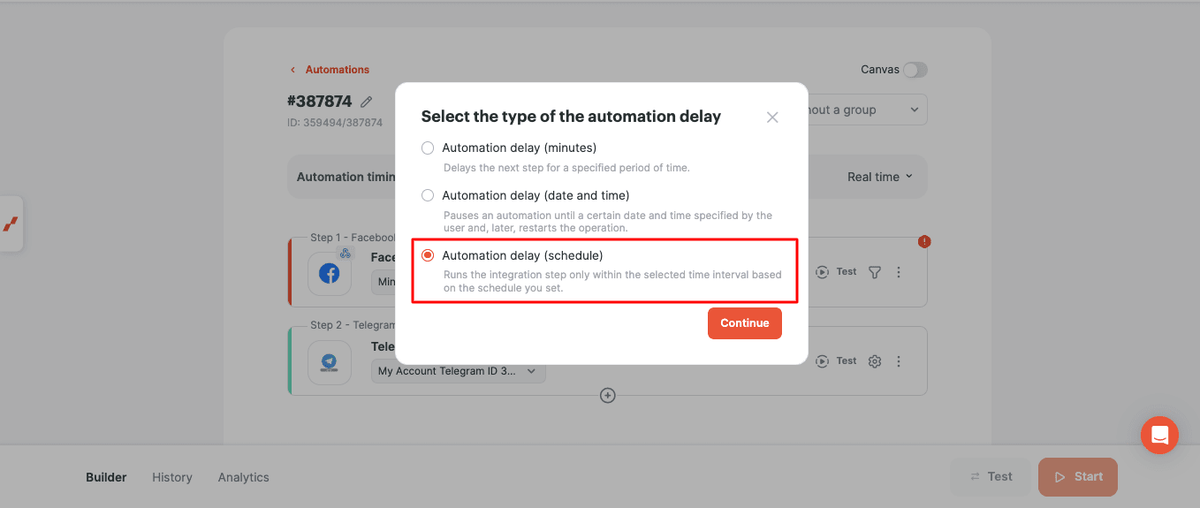
- Select Automation delay (schedule).
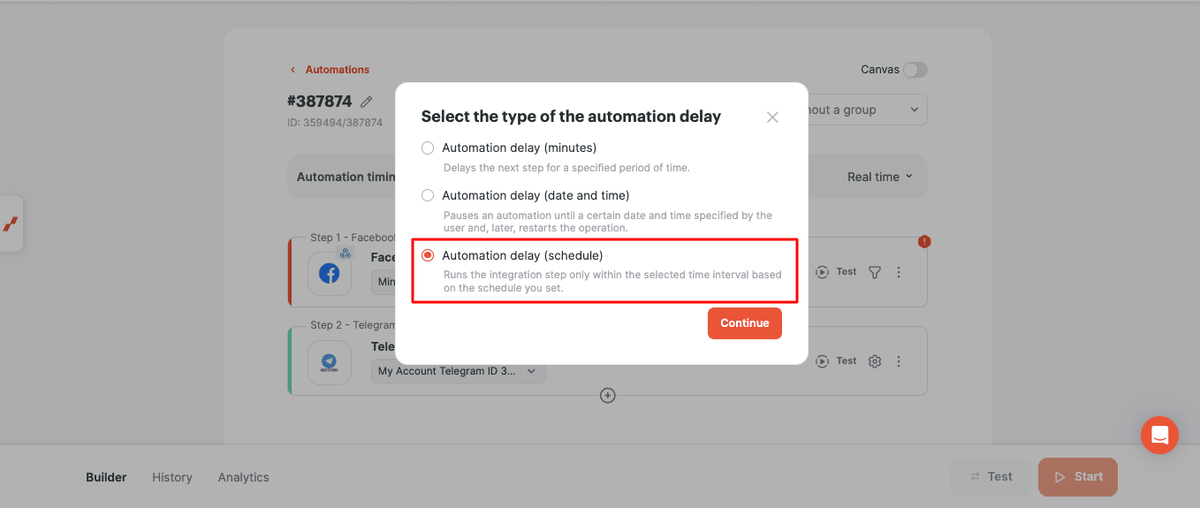
- Select a schedule tab and configure the waiting periods.
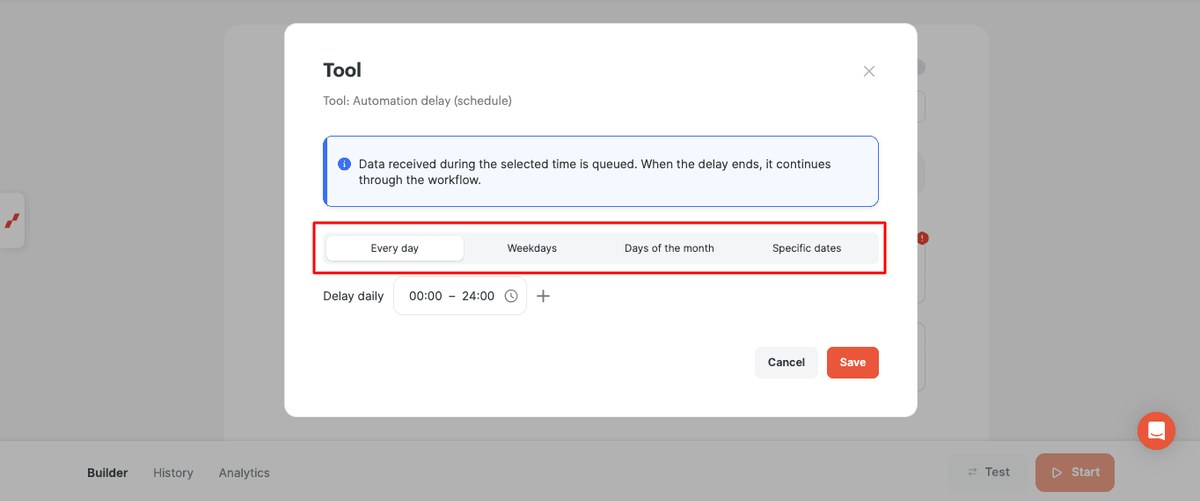
Every Day
Set a time interval during which the automation waits every day before continuing to the next steps.
For example, set a waiting period from 22:00 to 08:00. Data received during that interval stays in the queue until the interval ends.
Weekdays
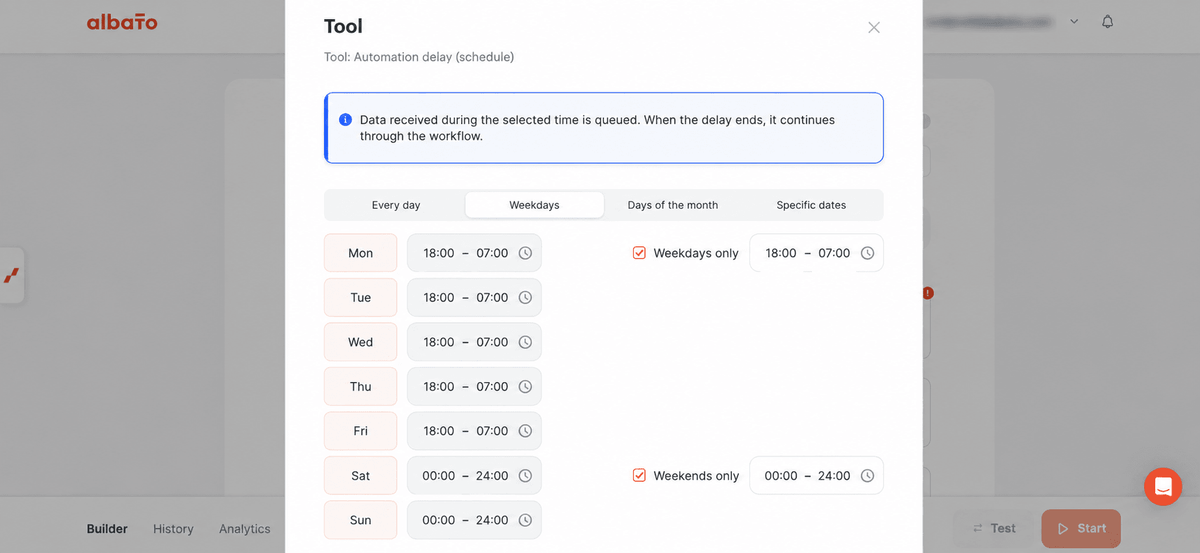
Set waiting intervals for individual days of the week. You can use one schedule from Monday to Friday and a different schedule on weekends.
Days of the Month
Select one or more days of the month and set the waiting interval. These are calendar day numbers, such as 1, 2, 3, 15, or 30, rather than weekdays. The settings repeat each month.
Specific Dates
Select an exact day, month, and year, then set the waiting interval. The setting applies only to that date, not to the same day in other months or years.
Example: Send Messages to New Leads During Business Hours
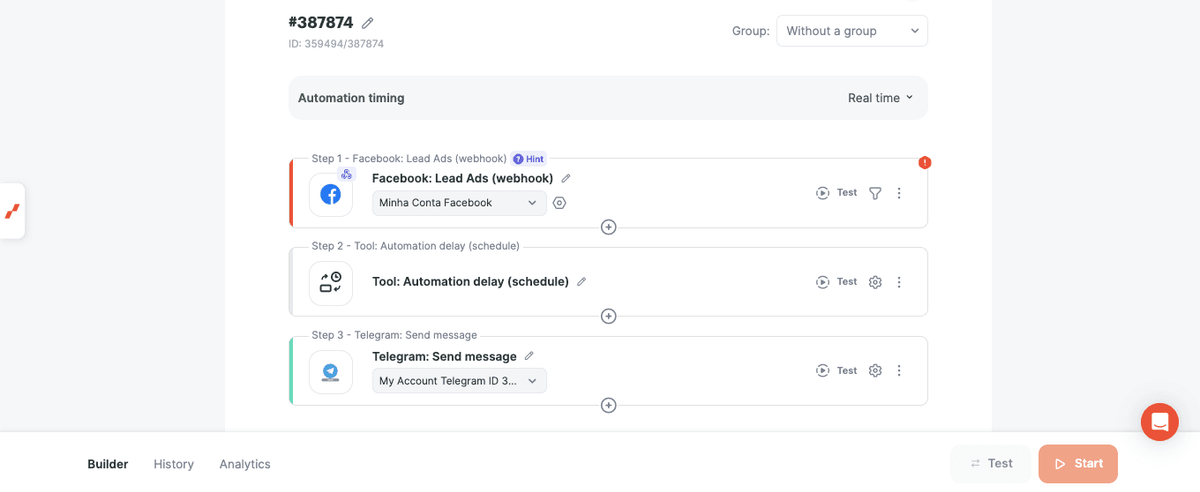
This example receives new leads from Facebook forms and sends a message through Telegram. The messages should be sent only on business days during business hours.
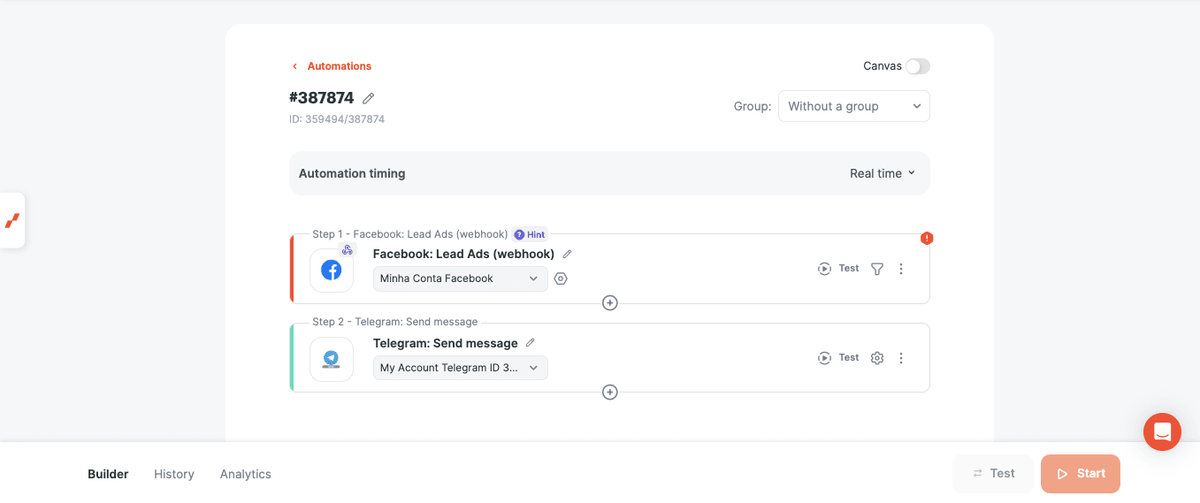
- Add a waiting step between the Facebook and Telegram steps.
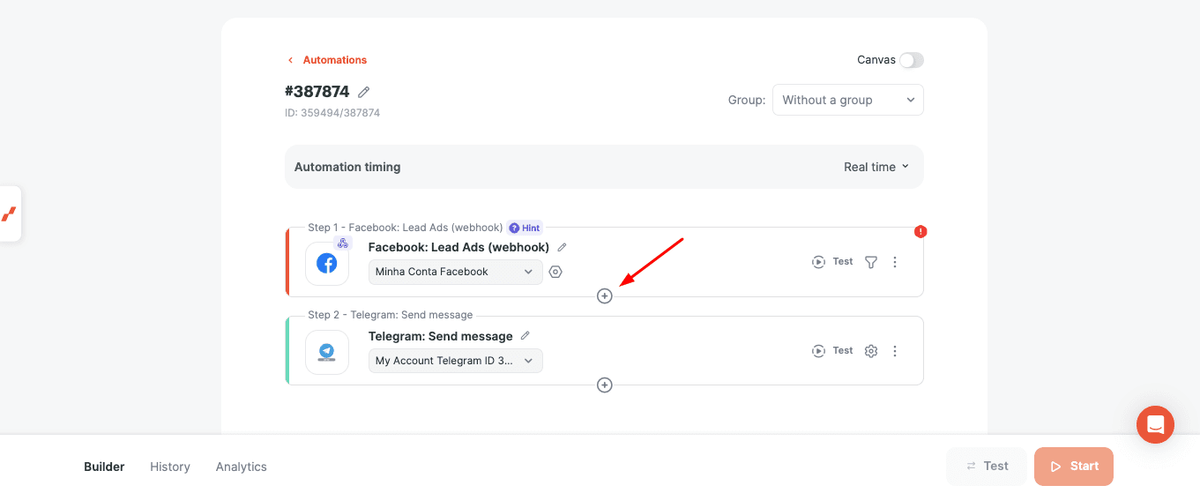
- Select Automation delay.
- Select Automation delay (schedule).
- Open the Weekdays tab. Set Saturday and Sunday as full-day waiting periods. For Monday to Friday, set the hours when messages must not be sent.
The example below pauses the automation outside the weekday sending window and throughout the weekend.
- Save the step and activate the automation. Incoming data will follow the configured waiting schedule.
Other Schedule Use Cases
- Weekly reports: hold sales data collected during the week until Friday, when the next reporting step should run.
- Advertising reports: receive data continuously and allow a reporting step to continue only on selected days of the month.
- One-off CRM updates: pause a step during a specified interval on an exact date. To wait until a particular date and time, use the date-and-time delay mode described above.
Choose waiting periods that match the hours when the next steps should not run.
Summary
The Automation delay tool lets you control the timing of an automation and choose one of three ways to delay it:
- for a fixed number of minutes;
- until a specific date and time;
- according to a defined schedule.
Use the option that fits your scenario to run actions exactly when needed, without losing incoming data.
Did this answer your question?